![[iOS] CI/CD 환경 구축하기 - 1. Tuist in Git Actions & fastlane](https://img1.daumcdn.net/thumb/R750x0/?scode=mtistory2&fname=https%3A%2F%2Fblog.kakaocdn.net%2Fdna%2Fc8BJjE%2FbtsC8UgnOYK%2FAAAAAAAAAAAAAAAAAAAAAIaedXfURlMcKdqmK0tfFN-1Vplx1aUow-Gmj0DGtJeR%2Fimg.png%3Fcredential%3DyqXZFxpELC7KVnFOS48ylbz2pIh7yKj8%26expires%3D1753973999%26allow_ip%3D%26allow_referer%3D%26signature%3D1nnzoA9VKouJ9AMJOHpEjauv5Aw%253D)
2년을 넘도록 언젠가는 해야겠다는 생각만 하다가 이제서야 하게 되는 CI/CD 설정입니다.
CI/CD가 무엇이냐? 에 대한 설명은 RedHat의 포스팅을 첨부하도록 하겠습니다.
What is CI/CD?
CI/CD introduces ongoing automation and continuous monitoring throughout the lifecycle of apps, from integration and testing phases to delivery and deployment.
www.redhat.com
이번 글에서 사용할 도구들은
Git Actions
Tuist 3.15.0
fastlane 2.217.0
입니다.
(버전은 글 작성 시점에서의 버전입니다.)
Tuist의 설치는 이전 포스팅을 참고해주세요
[iOS] Tuist - 1. XcodeGen에서 Tuist로
기존 프로젝트는 XcodeGen으로 관리되고 있었다. 이전에 XcodeGen을 사용했던 이유는 2~3개월의 짧은 협업 기간이 있었지만, 그 사이에 pbxproj에서 엄청난 Conflict를 겪었기에 도입을 했다. 실제로 도입
littlemoom.tistory.com
fastlane의 설치는
brew install fastlane혹은 공식 사이트를 참고해주세요.
https://docs.fastlane.tools/getting-started/ios/setup/
Setup - fastlane docs
Getting started with fastlane for iOS Setup Xcode for fastlane xcode-select --install Installing fastlane fastlane can be installed in multiple ways. The preferred method is with Bundler. fastlane can also be installed directly through Homebrew (if on macO
docs.fastlane.tools
총 4개의 스텝으로 진행해보겠습니다.
1. Tuist Generate in Git Actions
2. Build Project by Using fastlane in Local
3. fastlane match
4. Tuist + fastlane in Git Actions
1편에서는 1,2번, 2편에서는 3,4번에 대해 설명합니다.
1. Tuist Generate in Git Actions
먼저 Git Actions을 통해 Tuist를 활용한 Project가 잘 생성되는지 확인합니다.
저는 Push와 Pull Request가 이벤트가 발생되었을 때, Workflow가 작동하도록 했습니다.
name: CI/CD

on:
  push:
    branches: [ "CI/CD" ]
  pull_request:
    branches: [ "CI/CD" ]

jobs:
  build:
    name: Generate Tuist
    runs-on: macos-latest

    steps:
      # 1. Git Repository Checkout
      - name: Checkout Repository
        uses: actions/checkout@v3

      # 2. 프로젝트 build를 수행할 Xcode의 버전 설정
      - name: Select Xcode Version
        uses: maxim-lobanov/setup-xcode@v1
        with:
          xcode-version: latest-stable

      # 3. Tuist 설치 및 확인
      - name: Install Tuist
        run: curl -Ls https://install.tuist.io | bash

      - name: Tuist Version Check
        run: tuist version

      # 4. Fetch Tuist & Generate
      - name: Fetch Tuist
        run: tuist fetch

      - name: Generate Tuist
        run: tuist generate -n

      # 5. Pod install
      - name: Cocoapod install
        run: pod install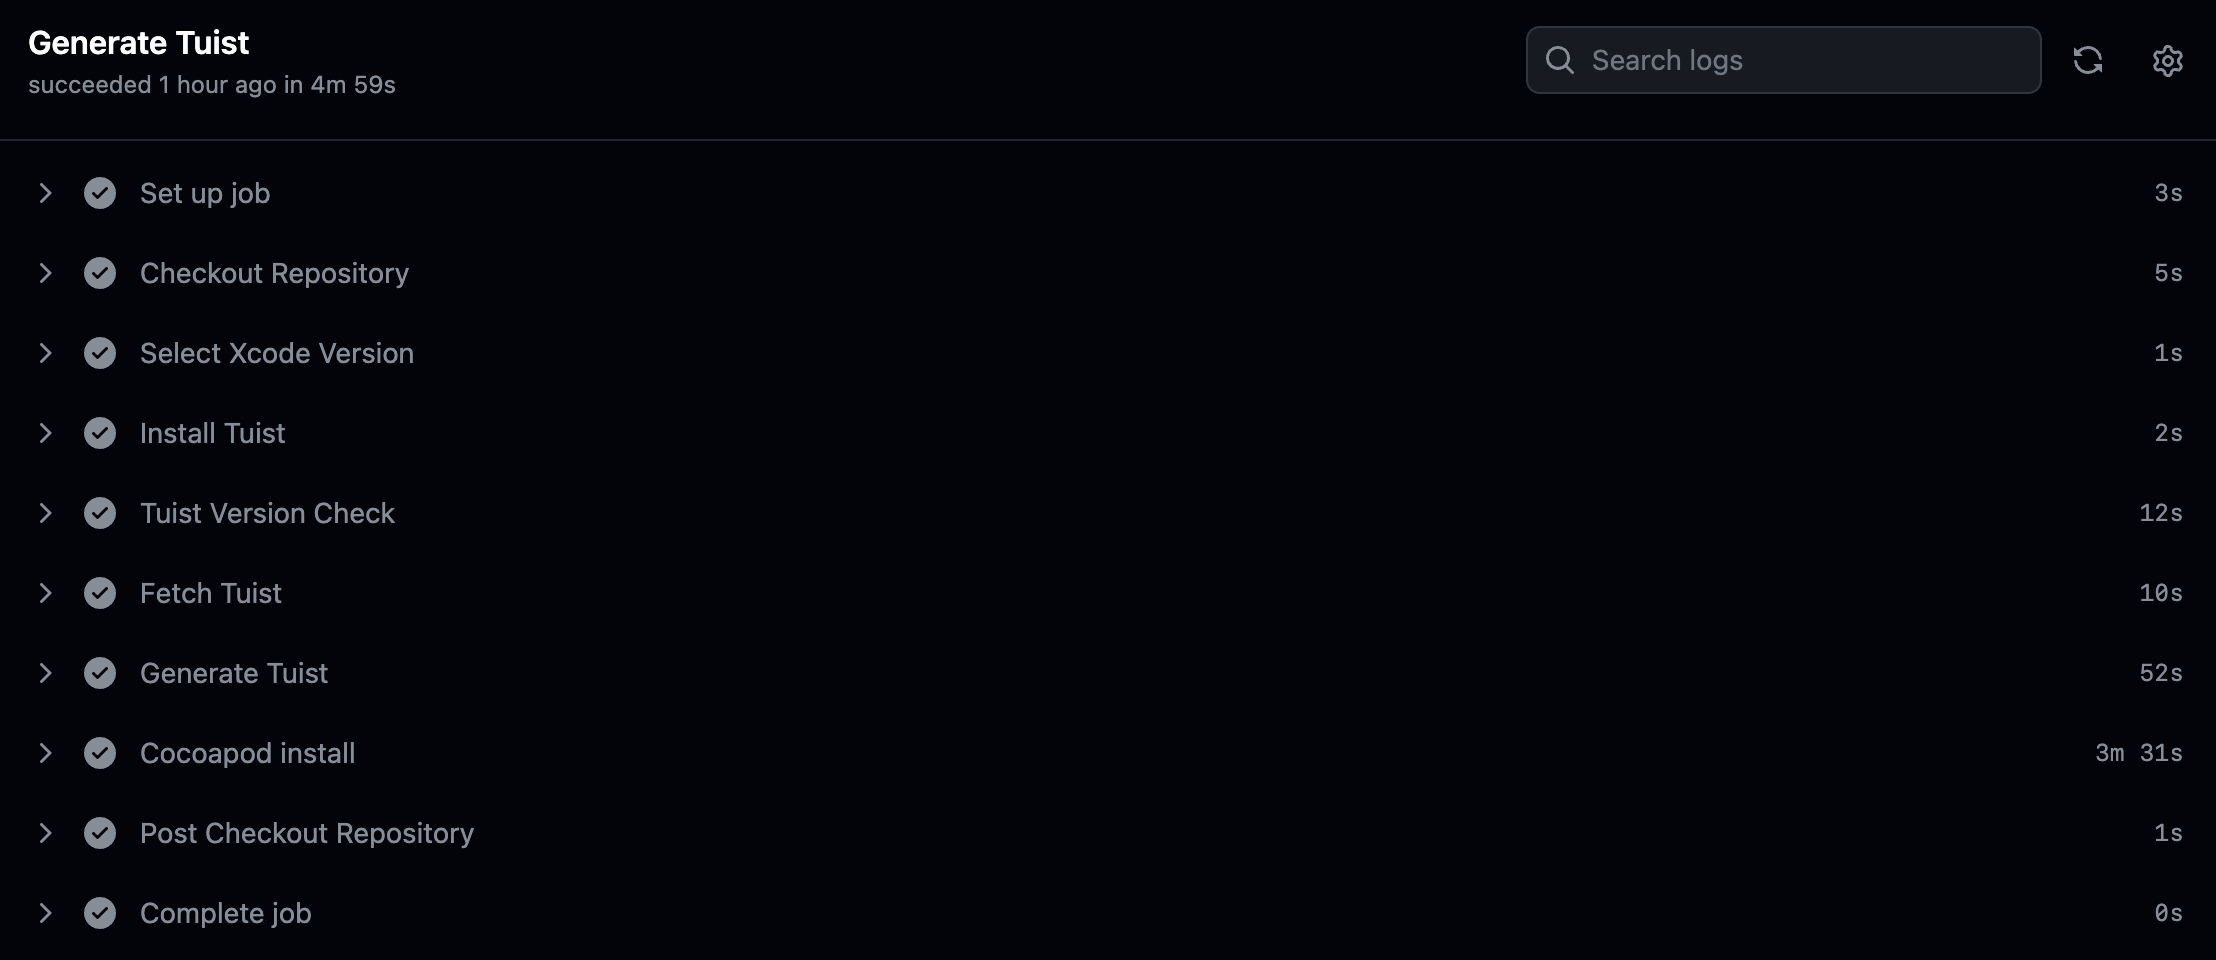
Git Actions에서의 Project 생성이 잘 되었습니다.
생성된 Project가 잘 빌드되는지도 아래 코드처럼 xcodebuild 커맨드를 스크립트 파일에 추가하여 확인해볼 수 있습니다.
# 6. Build Project using xcodebuild
- name: Build Project
run: xcodebuild -workspace "{PROJECT_NAME}.xcworkspace" -scheme "{SCHEME_NAME}" -destination "platform=iOS Simulator,name={DEVICE_NAME},OS=16.1" -verbose clean build
2. Build Project in Local
fastlane을 사용할 차례입니다.
우선 로컬환경에서 빌드가 잘되는지 먼저 확인합니다.
# Fastfile

# fastlane 사전 설정
default_platform(:ios)
xcode_select("/Applications/Xcode_14.1.app")

platform :ios do
  desc "Description of what the lane does"
  lane :{LANE_COMMAND_NAME} do
    build_app(
      workspace: "{WORKSPACE_NAME}.xcworkspace",
      scheme: "{SCHEME_NAME}",
      clean: true,
      export_method: "development",
      output_directory: "./build",
      include_bitcode: false,
    )
  end
end
LANE_COMMAND_NAME은 스트립트에 작성한 lane을 실행할때 사용될 명령어입니다.
내장된 명령와 겹치지 않도록 설정합니다. 예를 들어 LANE_COMMAND_NAME를 mylane으로 작성했다면,
$ fastlane mylane
# Architecture에 따라 arch -arm64 or -x86_64 명령어와 함께 실행해야할 수 있습니다.
위 명령어로 실행하게 됩니다.
현재 단계에서는 Automatically manage signing을 사용하고,
배포를 할게 아니기 때문에 export_method는 development로 설정해주세요.
Appfile에는 우선 App Bundle ID를 작성해줍니다.
app_identifier("{BUNDLE_IDENTIFIER}")인증서와 관련해서 이중인증 절차가 발생할 수 있습니다!
위 스크립트가 fastlane이 성공적으로 완료되면 successfully 문구가 출력되며,
build 폴더에는 ipa 파일이 생성됩니다.
다음 편에서는 Signing을 위한 match 사용과 Git Actions에서의 실행까지 가보겠습니다.
'iOS > iOS' 카테고리의 다른 글
| [iOS] Xcode 15 Rosetta (0) | 2024.01.30 |
|---|---|
| [iOS] CI/CD 환경 구축하기 - 2. fastlane match & CI/CD in Git Actions (0) | 2024.01.12 |
| [iOS] Tuist - 4. Project 생성 (0) | 2023.02.11 |
| [iOS] Tuist - 3. Target 생성 (0) | 2023.02.03 |
| [iOS] Tuist - 2. 프로젝트 파일 정리 (0) | 2023.02.02 |